A couple of weeks ago, I finally got the new Wacom Cintiq 24HD Display. There are two versions of this device, and people keep asking me if I got ‘the Touch,’ meaning the one that has touch features along with pen input. The answer is ‘No,’ and the reason is because even though I like touch features on my iPad and phone, I don’t feel the need for it on my main display. I know a lot of people want that, so it’s great that this display is available with and without the option. Keep in mind, there is also a significant cost difference between the two.
I’ve had my eye on the new Cintiq since it was launched earlier this year. Many of the new features that Wacom included finally pushed me over the edge to get one. Rarely do I develop an infatuation for new and shiny tech. I waited two months before I got my first-gen iPad, just to be sure it was going to be useful and not just a toy. Having used it every day since, I wasn’t disappointed. That being said, it’s two years old and I’ll only replace it for a newer version when it stops working well. I’ve never owned an iPhone and can’t think of any piece of technology I would line up for.
Now you might be thinking, why am I talking about Apple stuff, I thought this was about Wacom. The reason is that I want to be clear up front that I’m not a gadget person who gets something just because it’s new and trendy. If it’s not useful, I’m not interested. So with years under my belt with the Intuos line of tablets and being very pleased with those, why did I suddenly feel the need to get the high performance sports car of Wacom tablets?
I’ve never had a problem doing all of my detailed painted work on the Intuos tablets. They’re solid, they work well, they last forever and they get the job done. The size wasn’t an issue, working off the screen wasn’t an issue, resolution and pressure sensitivity worked well. The simple answer is that it was time. This is the top of the line professional tablet and I want my work to be the best it can be. From all I’ve heard from colleagues and other reviewers, their endorsement of what this display does for their workflow and better use of their time was enough for me to feel I needed to make the jump.
I’ve had the Cintiq 24HD for almost two weeks now. Normally I’d write a review for something new a lot sooner than this, but I’ve been swamped with work, which as a freelancer is not a bad thing at all. The upside of waiting this long for the review is that I’ve used it a lot. There is nothing that I do in my scope of work that I now haven’t done on the Cintiq. Daily editorial cartoons, illustrations, writing, and a brand new Totem painting from start to finish, I’ve really put it through its paces, and I am incredibly impressed.
There is just too much to talk about to do this in one post, so I’ll be spreading it out over two or three. For this one, I just wanted to talk about the features that impressed me most. I’ve never been one to do those ‘let’s unpack it’ reviews. There are plenty of those out there. As for the technical specs, you can see all of that as well as videos and other images on Wacom’s website. I just want to tell you how this will impact my own work and why I like the display so much. I made note of things that made me raise my eyebrows over the last couple of weeks. A few of these things even made me say, “oh cool!” out loud. They are in no particular order of importance.
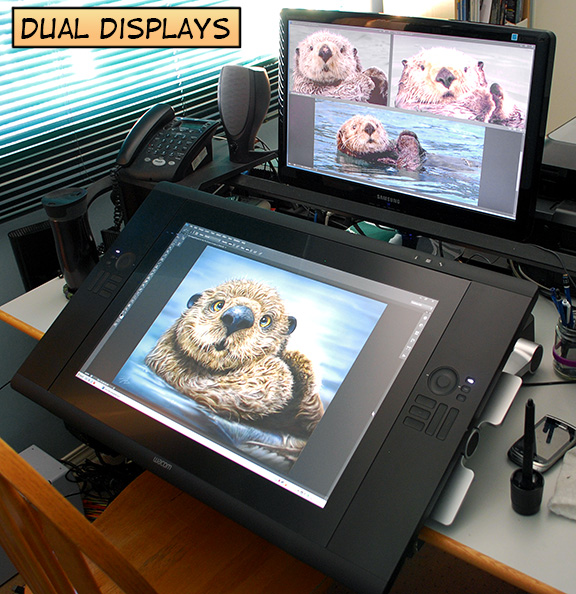
1) With a dual monitor system, I used to have my Photoshop palettes on a separate monitor. The Cintiq is so big and has so many Express Keys along with the Radial Menu, that I don’t need that anymore. I can do everything on this big screen. But I still like my second monitor, so I have it positioned above the Cintiq, and I can keep all of my other windows, browser, music player open on that display. By pressing one of the Express keys to ‘Toggle Display’, I can temporarily jump to the other monitor, and the Cintiq becomes just like a traditional Wacom tablet.
LOVE the new monitor configuration for reference photos! Just feels so natural to look up from my ‘drafting table’ to see the pics.
2) They put a USB port right on the display itself. Might seem like a small thing, but I frequently take images with me or grab them from a USB key. This is just convenient.
3) Wacom put a Tablet Properties button on the device itself. This is great because it gives you quick options to open the properties, make changes, then get back to work. It’s important to experiment with the Tablet Properties and more than a few times, I found myself thinking, “I should be able to program an Express Key to (insert operation, tool selection, or toggle here.) They made it easier to do that. I’ll detail all of my new settings in another post.
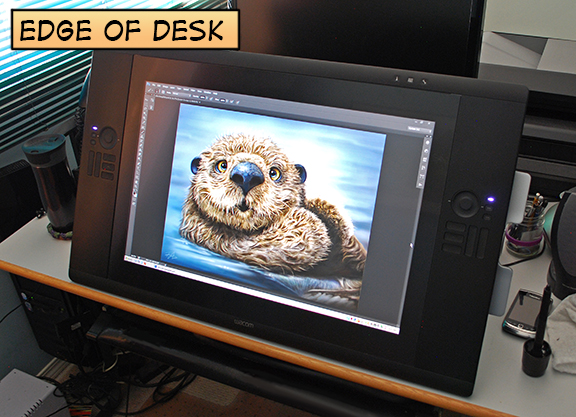
4) Pulling the device down over the edge of your desk, means forcing yourself to avoid using your keyboard. This is a good thing!
5) More buttons! I really like the fact that with Express Keys on both sides of the screen, plus two (count ‘em, TWO) touch rings, you get plenty of options on how to customize your Cintiq so it works perfectly for the way you work. A word of caution, however. Computers aren’t perfect and sometimes program conflicts or an accidental pressing of the Default button in the Wacom Tablet Properties can erase all of your settings, so be sure to backup your settings with the Wacom Tablet Preference Utility. I learned that lesson the hard way last week.
6) The display was so easy to set up. OK, I did have to wait for my wife to get home from work so she could help me bring it up two flights of stairs from the garage to my office. It’s 63lbs out of the box, quite large, and awkward to carry. I wasn’t about to risk any damage by trying to do it myself. Once I got it on my desk (oh, it’s staying there, now), the instructions were simple and straightforward. It was very much like setting up any new display. I use the Eye-One Color Calibrator and it was just as simple to calibrate the Cintiq as it is for any other type of monitor.
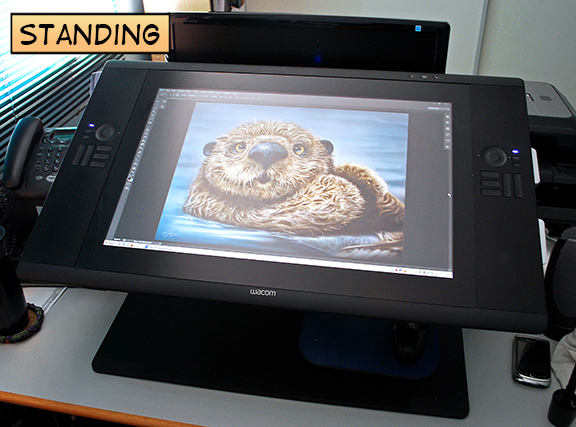
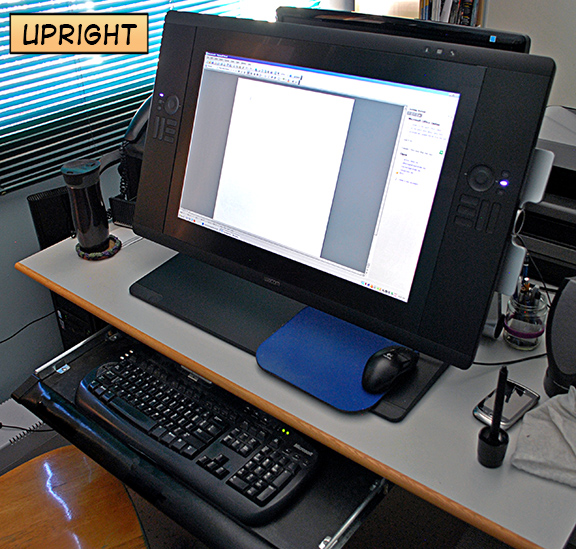
7) The Cintiq is just a joy to work on. The base is so well designed that I can’t think of any way to improve upon it. As shown in the images here, it locks in place when it’s fully upright, so it can be used like a standard display (a BIG standard display) or it can be used flat in the upright position. As someone who sits all day long while I work, I have contemplated getting one of those very expensive adjustable desks that allows a person to work standing up once in awhile. I no longer have to think about that, because the Cintiq lets me do that when I need a break from the chair. I did that a number of times in the past couple of weeks and loved having the option.
8) Word of caution. This thing is BIG. I have a great coffee cup that I got at Costco (three of them, actually) made by Contigo. You can see it to the left of the display in the photos. It seals completely and to take a drink, you have to press a button on the back to open it. It’s great because it not only keeps coffee hot for well over an hour, but it if you drop the cup or knock it over, it doesn’t spill. Because I start work very early in the morning and work in low light as often as possible, my office is usually near dark. In the first week of using the Cintiq, I knocked over my coffee cup three times when I went to adjust the display with the handles on the sides. It’s just so big!
And finally, it’s solid! There is nothing about this display that feels cheaply made. The enjoyment I’m having drawing and painting on the screen is difficult to explain. Working on little hairs with the pen at the same point of contact as my brush strokes just feels so much more natural.I’ve often dealt with back pain off and on over the years, usually stress related from working hunched over too much. As I said, I was so busy with deadlines that I’ve spent a LOT of time on this device. One thing I noticed, a great surprise, is that I had no significant neck or back pain as a result. Sure, tight shoulders and strain just from sitting so long and working, you’ll get that in any job when you’re working long hours, but nothing that didn’t go away with rest and nothing that I had to take an Advil for.
So, yes, I’m enjoying the Cintiq 24HD a great deal, and I’m sure I’ll continue to discover things that make me say, “Oh, cool,” and I’ll be sure to share them. Next time, I’ll talk about having to change all of Express Key, Touch Ring and Radial Menu settings. When you’re working directly on the screen, it’s a whole new ballgame.